Android 13 has been released for Pixel phones and is available for Pixel 4 and above. There are numerous enhancements in this, both for user experience and under the hood performance and security fixes. You can read more about the release in the official blog here.
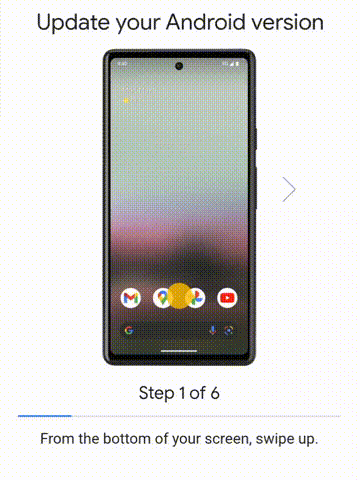
Follow the steps as shown in the below graphic to update your phone.
You can also visit the Pixel Phone Simulator at this link to check out how to use the various functions available.
Android 13 will also roll out to your favorite devices from Samsung Galaxy, Asus, HMD (Nokia phones), iQOO, Motorola, OnePlus, Oppo, Realme, Sharp, Sony, Tecno, vivo, Xiaomi and more, in the coming months.
For Advanced Users
I currently use a Pixel 6a and strangely I didn’t get the update on my phone even after multiple tries with the above steps. So I went for a manual update method. If you are also in the same boat, then follow these steps to get updated.
Make sure you have taken a backup of your phone before attempting these steps.
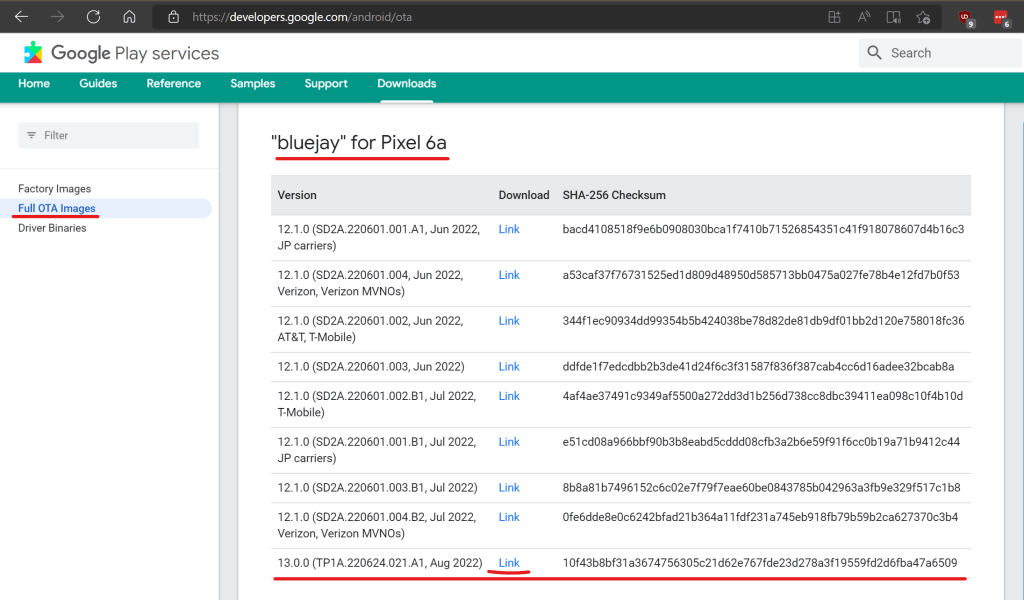
First visit this link to download the full OTA image for your Pixel phone. Make sure to download the correct one. For example I downloaded from the “bluejay for Pixel 6a” table version 13.0.0 (TP1A.220624.021.A1, Aug 2022)
OTA images allow the phone to be updated without wiping it, if you’re looking to wipe the phone you can use the Factory images from the same page below by selecting it from the left side menu.
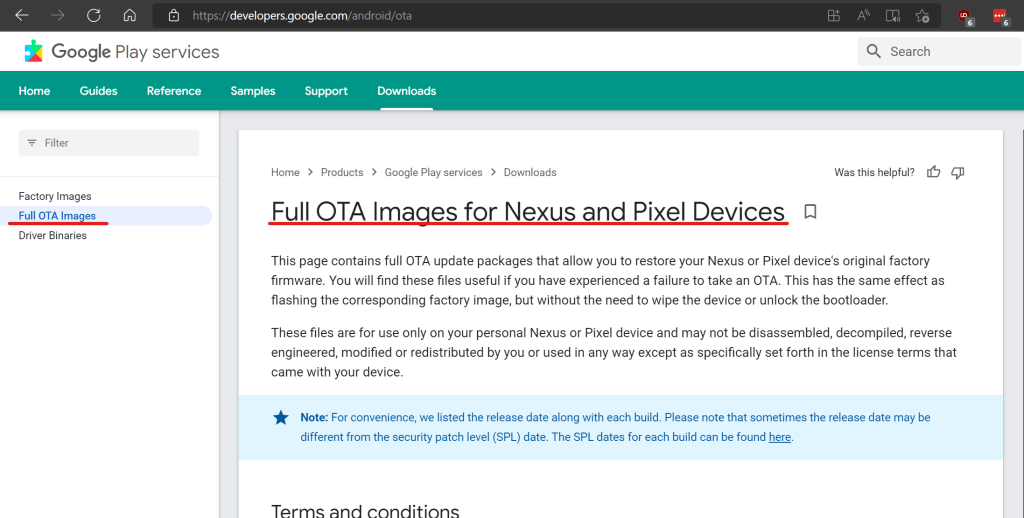
Scroll down the page to find appropriate downloads for your device
On a Windows device, download the Android SDK platform tools which contains the adb tool. This tool is used to push the OTA update from the Windows machine to the phone while connected with a USB cable. You can download the tool from here.
On your Pixel phone, developer mode needs to be enabled. This can be done by navigating to the Settings – About phone and then tapping 7 times on the Build number. Once there’s a pop-up message saying Developer mode is enabled, head over to Settings – System – Developer Options. Scroll down to the option USB debugging and enable it.

Once done, connect your phone to the Windows device using the USB cable. Open Command prompt in Admin mode and navigate to the folder where you downloaded the SDK platform tools.
Type adb devices and you should see your device serial number indicating that its recognized. The first time you do this, there will be a pop-up on phone to allow the ADB connection, select the option Always allow from this computer.
In case no number is shown, that means that a device driver needs to be installed. Head over to Device Management in Control Panel, look for any Unknown device or a device listed as Pixel phone. Download the driver from here and follow instructions here to install it for Windows.
If the device is recognized as shown below, type adb reboot recovery. This will make the phone reboot immediately and show a Android robot image with red triangle.
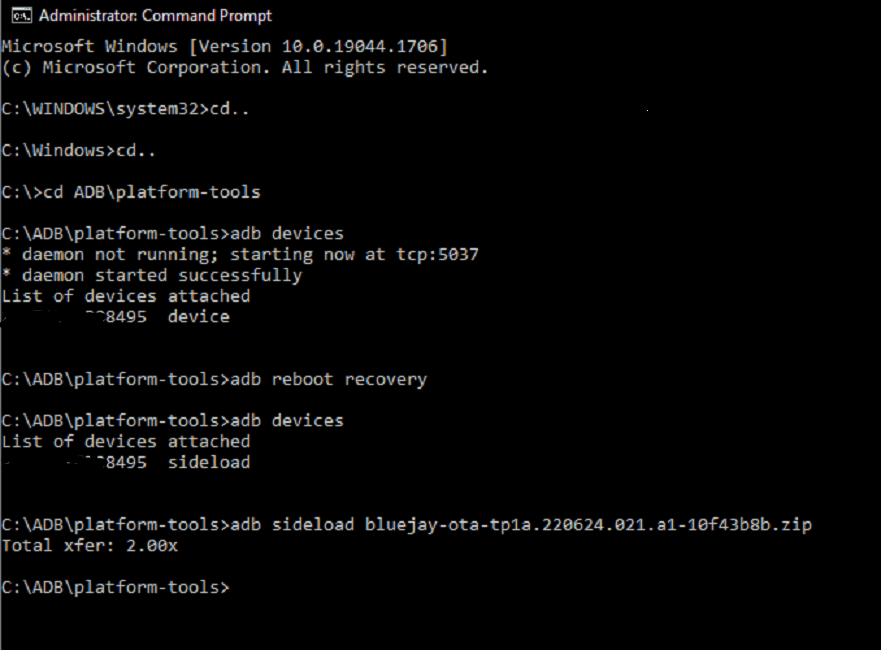
At this point, hold the Power button and press Volume Up button once. This will bring up the Recovery Menu on the phone as shown below. Scroll down using Volume Down button and Select ‘Apply update from ADB’. At this point, your phone is waiting for the update to be pushed.
Type adb devices once again and it should show the serial number with sideload mentioned against it.
Use the adb sideload <OTA File Name> command to push the update. Make sure the OTA file you downloaded earlier is in the same folder where the adb file or the SDK tools were downloaded.
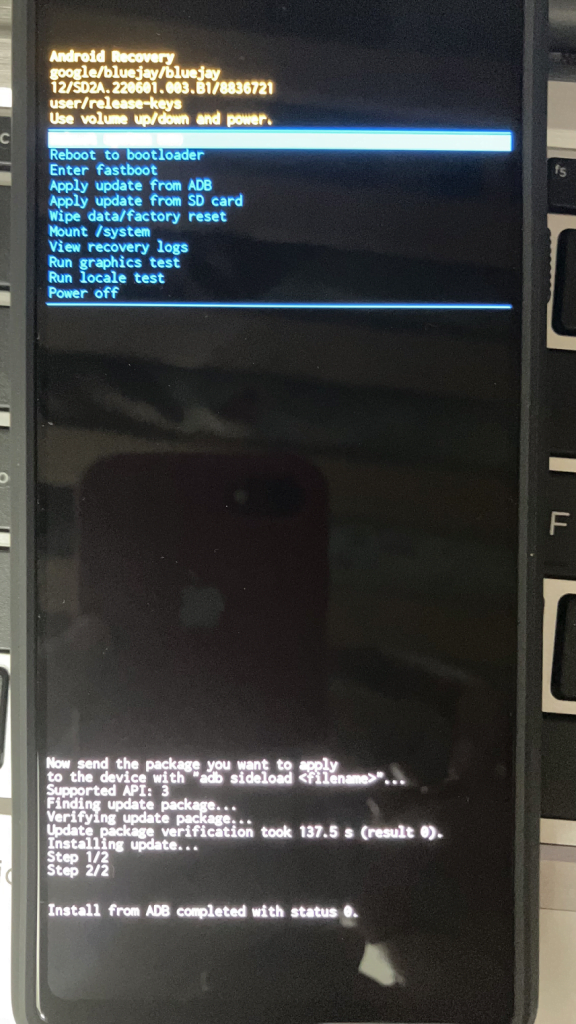
And that’s it, once the update completes it will show the message with ‘completed with Status 0’. At this point, reboot the phone from the menu. Your phone should be updated to Android 13 now. Enjoy.
Reference: Link to Google developer page